Install & Your First Recording
Chapter 2: Install & Your First Recording
Under five minutes from a fresh Chrome to a finished recording sitting in your web library.
Install from the Chrome Web Store
- Open the Chrome Web Store listing (linked from
app.seameet.aior search for "SeaMeet"). - Click Add to Chrome and confirm the required permissions when Chrome prompts you.
- When installation completes, a new tab opens at
app.seameet.ai/welcome/extensionto walk you through first-run. You can close it once you've read it.
Pin the extension. Click the puzzle-piece icon in the Chrome toolbar, find SeaMeet, and click the pin icon next to it. This makes the SeaMeet icon a permanent toolbar button so you don't have to open the puzzle menu every time.
What the required permissions actually do
Chrome will ask you to allow the following. All are used by the recorder itself; none share data with third parties.
| Permission | Why the extension needs it |
|---|---|
tabs, activeTab | Know which tab you're recording so it can label the recording and detect meeting ends. |
storage | Store the durable "saved on this device" recovery cache and your session. |
scripting | Inject the meeting-detection content script into supported meeting sites. |
identity | Sign you in via Google OAuth without you having to leave the browser. |
sidePanel | Show the recorder UI in Chrome's built-in side panel. |
tabCapture | The core recording API — captures the audio and video of the tab you're recording. |
offscreen | Keep the audio encoder alive after the service worker sleeps, so long meetings don't stop halfway. |
The extension also asks for optional host permissions the first time you record on Zoom, Teams, Webex, and other supported platforms. Grant them only when you use those platforms — see Chapter 3.
Open the side panel
Two ways:
- Click the pinned SeaMeet icon in the Chrome toolbar.
- Press
Ctrl+Shift+S(Windows / Linux) orCmd+Shift+S(macOS). This is the extension's default keyboard shortcut and works from any tab.
The side panel opens on the right side of the browser. The first time, it shows a "Sign in" button — you can skip this and record anonymously, or sign in for automatic cloud upload and access to your library. See Chapter 5.
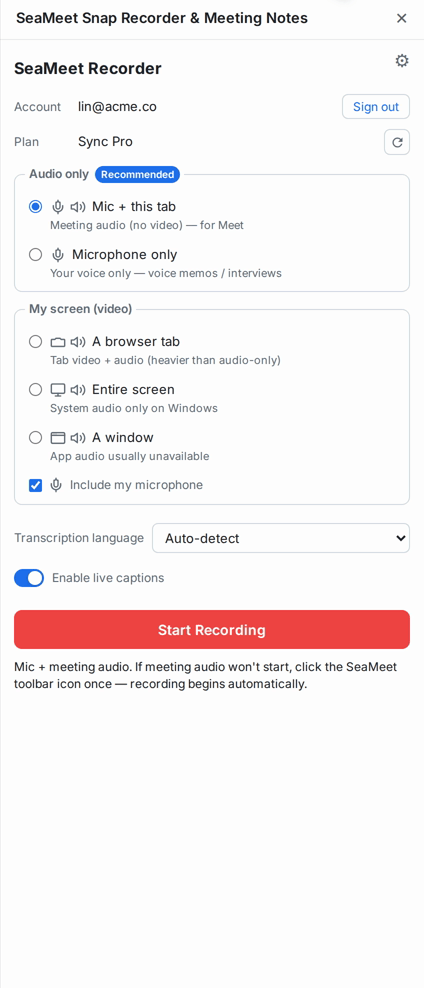
Your first recording
- Open a tab with any audio you can hear — a YouTube video is a good test.
- Open the SeaMeet side panel (
Ctrl+Shift+S/Cmd+Shift+S). - Click Start recording. Chrome shows its own "SeaMeet is capturing this tab" indicator at the top of the tab — this is Chrome's tab-capture UI, not the extension's.
- Let it record for 20–30 seconds.
- Click Stop in the side panel.
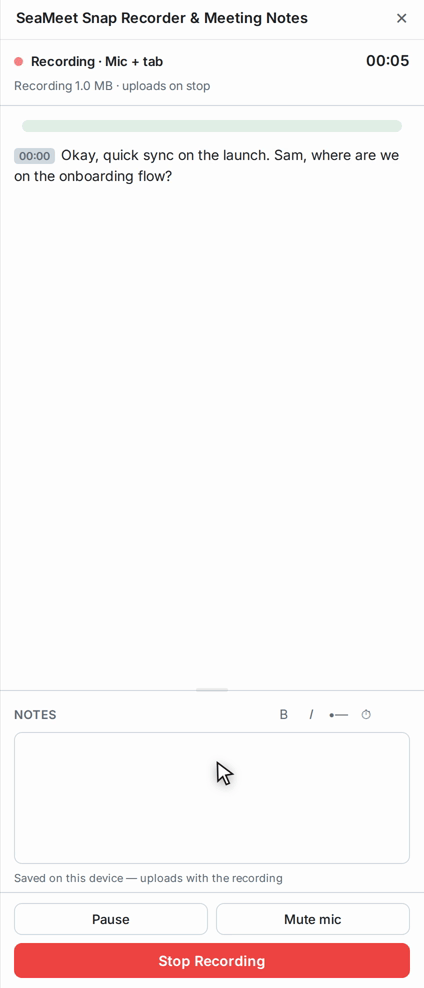
If you were signed in when you stopped, the recording begins uploading to your library. A green upload progress bar appears in the side panel. When it finishes, the recording is visible at app.seameet.ai.
If you weren't signed in, the recording is stored in your browser's local storage. Sign in when you're ready — the recording will appear in the "saved on this device" list and you can upload it then. See Chapter 6.
What you'll see in the side panel while recording
- The elapsed time at the top.
- The live transcript with speaker labels, updating every few seconds.
- (Signed-in only) A notes card you can drag to resize, for typing thoughts as the meeting happens.
- A Stop button, and (during a meeting) a compact toggle to collapse the recording widget out of the way on Google Meet.
Common first-run gotchas
"The extension isn't there when I press the shortcut." Some Chrome installs bind Ctrl+Shift+S to another extension. Open chrome://extensions/shortcuts, find SeaMeet, and either accept the conflict warning or rebind it.
"Tab capture failed." Reload the tab and try again. Chrome refuses to attach the tab-capture API to tabs that were open before the extension was installed — a reload gives it a fresh context. This is a Chrome limitation, not a SeaMeet bug.
"The recording widget on Google Meet is in my way." Click the small collapse icon next to it. It's Meet-only and localised.
Quick Reference
| Task | How |
|---|---|
| Open the side panel | Ctrl+Shift+S / Cmd+Shift+S, or click the toolbar icon |
| Rebind the shortcut | chrome://extensions/shortcuts |
| Change to the dev backend (developers only) | See the extension's README.md — scripts/switch-env.sh dev |
| See what version you're running | chrome://extensions/ → SeaMeet → Details |
Last updated: 2026-08-27
Published: